

What Is A Mando (Mandatory) In Disc Golf?
A mando, also known as a mandatory, is a disc golf obstacle in which a player must throw their disc through a defined gap or route in order to complete the hole. Mandos can be either permanent or temporary, and can be used to add an extra layer of challenge to a course.
Mando is used in disc golf to add an extra level of challenge and strategy to the game. It is used to force players to hit certain spots on the course in order to score well. This adds an extra element of skill and challenge to the game and helps to keep it interesting. If the hole is designed with a mandatory sign, and you happen to miss the designated throw or ‘miss the mando’ you are penalized one stroke.
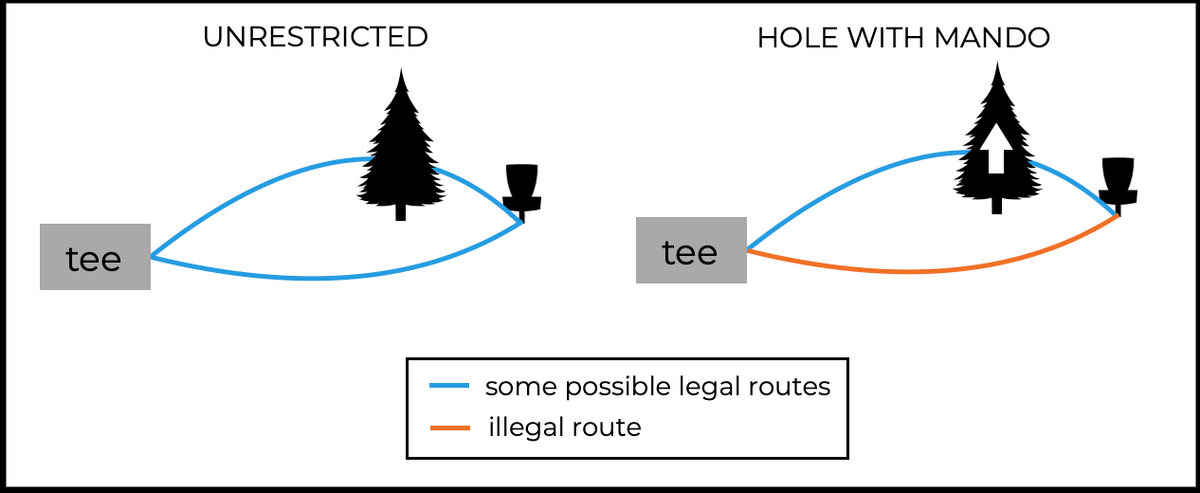
credit: udisc.com
Why have a mando on disc golf course?
Having a mando on a disc golf course adds an extra layer of challenge and fun to the game. It also helps to limit the number of discs thrown in certain areas and prevent players from taking unfair shortcuts. Additionally, mandos can help to add a sense of strategy to the game and make it more enjoyable for all levels of players.
credit: udisc.com
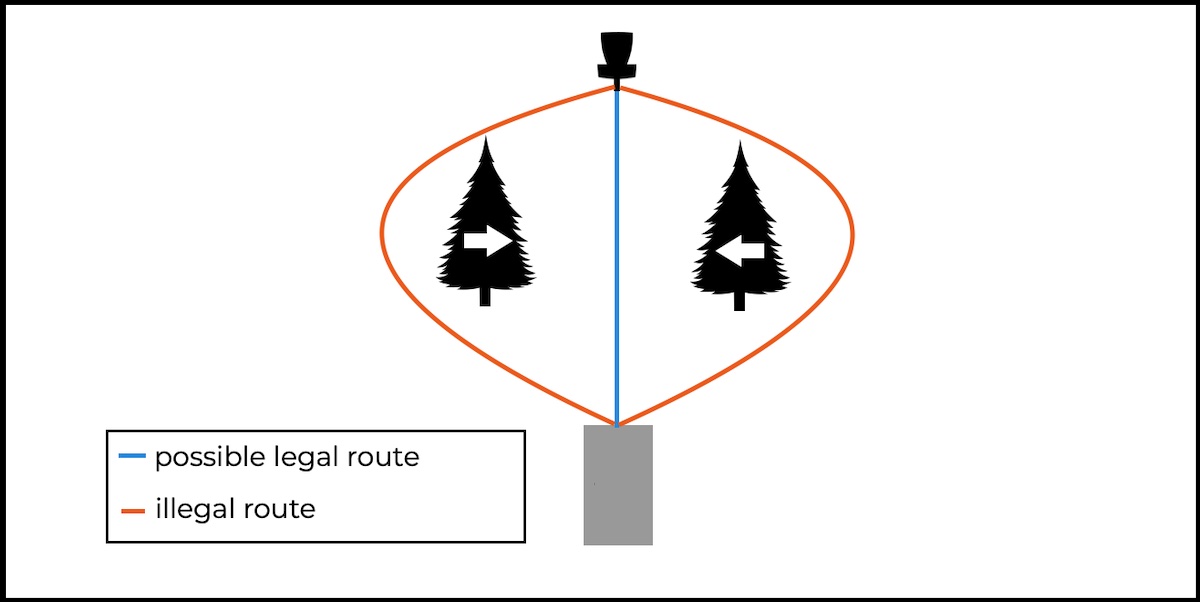
Types of mandos in disc golf
Disc golf mandos (mandatory obstacles) are typically used to define the fairway, either to protect a hazard or to create a challenging line. There are three types of mandos commonly used in disc golf:
- Left/Right Mandos: These are two separate poles placed a certain distance apart. One pole is marked with a left arrow, the other with a right arrow. Players must throw their disc between the two poles in the direction of the arrows.
- Single Mandos: These are single poles placed in the fairway to create a specific line of play. The player must throw the disc on the side of the pole designated by a left or right arrow.
- Island Mandos: These are poles placed in the fairway to create an artificial island. Players must throw their disc around the island, either clockwise or counter-clockwise, as indicated by the arrows on the pole.
Tips on hitting a mando in disc golf
- Choose the Right Disc: Choose a disc that is designed for the type of shot the mando requires
- Grip: Grip your disc with three fingers in the “power grip” for maximum control.
- Aim: Aim the disc toward the mando and make sure the discs flight path allow for flight through or around the mando obstacle.
- Release: Release the disc with a smooth, even pull on the disc. Make sure your arm is in a straight line with your shoulder for maximum power and accuracy. Remember, Smooth and controlled shots are key.
- Follow Through: As the disc leaves your hand, follow-through with your throw and let your arm extend away from your body. This will help you maintain control and accuracy.
- Practice: Practice makes perfect. The more you practice, the better you will become at hitting the mando.
Closing
As we conclude our exploration of the “mando” in disc golf, we hope you now have a clear understanding of this unique and strategic element that adds an exciting twist to the game. Mandos serve as navigational challenges, requiring players to shape their shots in specific ways to adhere to the designated course route.
Mandos are not just about adding difficulty; they test a player’s versatility, accuracy, and decision-making skills. Successfully maneuvering through a mando can be a gratifying experience, showcasing your ability to adapt and rise to the challenges on the course.
Remember, when faced with a mando, take your time to assess the situation and choose the most suitable disc and throwing technique. Pay close attention to any signage or instructions provided, as violating a mando can incur penalties and affect your overall score.
As you encounter different mandos on various courses, view them as opportunities to expand your disc golf repertoire and master new shots. Embrace the challenge and approach each mando with confidence, knowing that conquering them will lead to personal growth as a disc golfer.
Ultimately, disc golf mandos exemplify the dynamic and ever-evolving nature of the sport. Embrace these exciting challenges, continue to improve your skills, and let the joy of disc golf shine through every round you play.
So, fellow disc golfers, may every mando be a chance to showcase your skills, make strategic choices, and revel in the thrill of the game. Happy disc golfing, and may your throws navigate every mando with precision and finesse!


